Introduction
Developing for embedded targets on host platforms have a few prominent downsides, such as rebooting back and forth between the test and development environment to compile and debug your source code. However, since there are IDE’s (integrated development environment) like Qt Creator, it’s doomed if we do not take advantage of the support provided by Qt for developing for embedded system targets. In a single click, for instance, the source code can be built, run, and deployed.
To achieve that, Qt must be configured and cross-compiled along side the used library. In this tutorial we explain step by step how Qt can be configured for running desktop-style application on Raspberry Pi and hereby Qt libs are required, and running console applications where Qt libs are not needed.
Definitions
In general, compiling is the act of translating a human-readable language (such as C++, C) into architecture-specific binary encoded operations. Therefore, the main job of a compiling program (compiler) is to convert the source code into an executable binary image that is ready to run on a specific target.
The process of compiling involves five distinct stages: pre-processing, proper compiling, assembling, linking and locating. So, it’s noteworthy that the meaning of compiling in this tutorial includes all of these aforementioned stages [1].
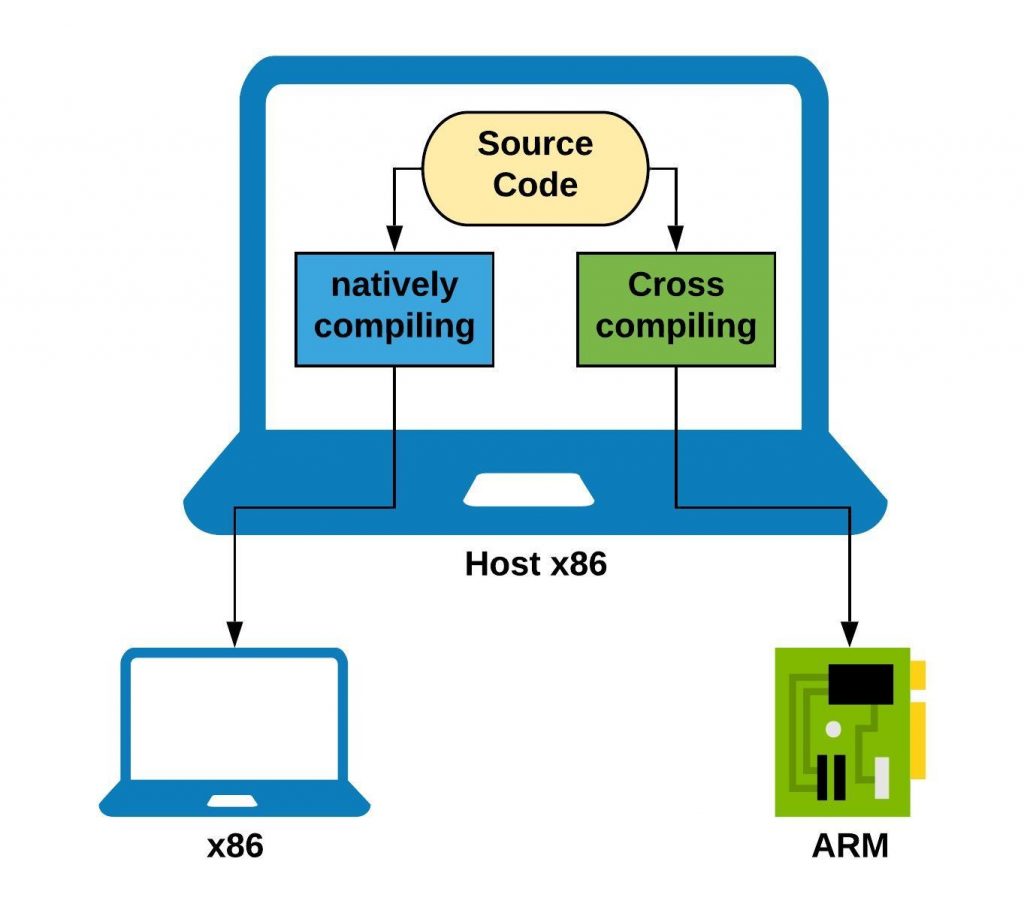
It’s important to distinguish between the host platform where the compilation is performed, and the target platform where the executable is expected to run on. When in fact, the host and target platforms are the same type of machine, then it’s natively compiling. And when the target and the host are different, then it’s cross-compiling.
RAISON D’ÊTRE
The reasons behind choosing cross-compiling over natively are as follows:
- Speed: the embedded target is much slower than the host in terms of performance and magnitude. For instance, compiling one simple program may take a long time to finish on the embedded board, such as Raspberry Pi. While that compiling can take unnoticeable time on the host [2].
- Capability: compiling is very disruptive and resource-intensive, which means low RAM and disk memory can have a considerable impact on the compilation process [2].
- Convenience: Qt creator (IDE) provides support to run, debug, and analyse the source code from the host towards the target. In other words, the Qt creator on the host can run and debug the source code immediately on the target over SSH connection [3].
HARDWARE AND SOFTWARE PREREQUISITES
The used hardware and software in this tutorial are listed in Tables 1,2. The target or host platform can work with any hardware arrangements.
In the next section, it is assumed that the Debian operating system is up and running on the host platform using Oracle VirtualBox.
| Name | Description | Source |
| Debian buster | The host operating system | debian.org |
| Oracle VirtualBox | To support the creation and management of the guest virtual machine running Debian. | virtualbox.org |
| Qt Creator | The integrated development environment | www.qt.io |
| Raspbian Buster Lite | The target operating system | raspberrypi.org |
| Name | Description | Datasheet |
| HP omen PC | Th host platform | hp.com |
| Raspberry Pi 3 Model B. | The target platform | raspberrypi.org |
CROSS-COMPILING STEPS
If your is to build a desktop application then follow steps
- Writing the Raspbian image to SD card
Firstly, the operating system needs to be installed on the SD card to boot up on Raspberry Pi. The official guide provided by raspberrypi.org is followed by the use of the BalenaEtcher tool.
2. Cross-Compiling Qt
Before beginning with the cross-compiling steps, it’s worth mentioning that some instructions sometimes are needed to carry out on one of the two platforms i.e. host and target. So, to avoid confusion, before each step the platform is noted.
Those steps are derived and based on the following sources:
[4] [5] [6] [1] [7] [3] [8] [9].
2.1. [on RasPi] Installing Qt dependencies
Firstly, we uncomment the deb-src line in /etc/apt /sources.list file through the use of Nano editor.
$ sudo nano /etc/apt/sources.listSecondly, we update the system and install the following libraries with the gdbserver debugger.
$ sudo apt-get update
$ sudo apt-get build-dep qt4-x11
$ sudo apt-get build-dep libqt5gui5
$ sudo apt-get install libudev-dev libinput-dev libts-dev libxcb-xinerama0-dev libxcb-xinerama0
$ sudo apt-get install gdbserver
Thirdly, we create a directory to store the built Qt binaries.
$ sudo mkdir /usr/local/qt5pi
$ sudo chown pi:pi /usr/local/qt5pi
2.2. [on PC] Preparing the cross-compiler
After updating the Debian virtual machine, we install the cross compilers package and GNU debugger from the Debian repository. Some tools are also needed to be installed for some instruction throughout these steps, such as git and wget. Therefore, we install them in this step.
$ sudo apt-get install git wget rsync cmake
$ sudo apt-get install crossbuild-essential-armhf
$ sudo apt-get install gfortran-arm-linux-gnueabihf
$ sudo apt-get install gdbserver gdb-multiarch
We sync the system root files of Raspberry Pi with the help of the rsync file-copying tool. Before resyncing, we create a working directory.
$ mkdir ~/cross-compiled-qt-opencv
$ cd ~/cross-compiled-qt-opencv
In the following instructions, replace the IP address with the address of the RasPi and the username with yours. The username used here is pi and the IP address is 192.168.1.172.
$ mkdir sysroot sysroot/usr sysroot/opt
$ rsync -avz pi@192.168.1.172:/lib sysroot
$ rsync -avz pi@192.168.1.172:/usr/include sysroot/usr
$ rsync -avz pi@192.168.1.172:/usr/lib sysroot/usr
$ rsync -avz pi@192.168.1.172:/opt/vc sysroot/opt
The symlinks of sysroot files might be broken, so we adjust them by executing the following script.
$ wget https://raw.githubusercontent.com/Kukkimonsuta/rpi-buildqt/master/scripts/utils/sysroot-relativelinks.py
$ chmod +x sysroot-relativelinks.py
$ ./sysroot-relativelinks.py sysroot
2.3. Installing qtbase and Configuring Qt
We clone the qtbase from the Qt repository with the following command. The Qt version installed here is 5.13.
$ git clone git://code.qt.io/qt/qtbase.git -b <qt-version>Now, we come to the most crucial part i.e. configuring Qt. At first, we change the current directory to the directory where qtbase resides and we execute the following commands.
$ cd qtbase
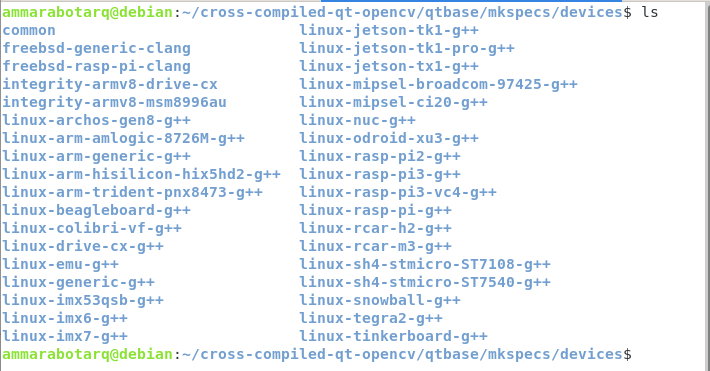
$ ./configure -release -opengl es2 -device linux-rasp-pi3-g++ -device-option CROSS_COMPILE=arm-linux-gnueabihf- -no-use-gold-linker -sysroot ~/cross-compiled-qt-opencv/sysroot -opensource -confirm-license -make libs -prefix /usr/local/qt5pi -extprefix ~/cross-compiled-qt-opencv/qt5pi -hostprefix ~/cross-compiled-qt-opencv/qt5 -vThe -device<name> parameter is used to select the mkspec of the targeted device. This contains configuration and graphics adaptation code for the selected device. The device name should match one of the subdirectories in the qtbase/mkspecs/devices. For the Raspbeerry Pi we choose linux-rasp-pi3-g++, see Figure 2.
After the configure command is finished successfully, then run make and make install.
$ make -j4
$ make install
For speeding up the building process, the -j option is added up to the make command (e.g. make -j4 on a four-core CPU).
After those steps had been completed successfully, the last step remained is to sync those built binaries to the prefix we created on the Raspberry Pi. This can be done with the following command.
$ cd ~/cross-compiled-qt-opencv/
$ rsync -avz qt5pi pi@192.168.1.172:/usr/local
2.4. [on RasPi] Adding Qt libs to system library path
To allow the dynamic linker finds the Qt libs on which the Qt executable depends on, the path to the Qt libs should be placed onto a conf file in the directory /etc/ld.so.conf.d. Now, whenever a library is added or removed, we should run the command ldconfig, which will update the links of the shared libraries.
$ echo /usr/local/qt5pi/lib | sudo tee /etc/ld.so.conf.d/qt5pi.conf
$ sudo ldconfig
CONCLUSION
This paper has contributed to simplify the cross-compiling and configuration procedures and shows that it is feasible to cross-complies multiple libraries to be bundled and used in one project.
REFERENCES
[1] M. B. Anthony Massa, “Compiling, Linking, and Locating,” [Online]. Available: https://www.oreilly.com/library/view/programming-embedded-systems/0596009836/ch04.html. [Accessed 5 August 2019].
[2] landley, “Introduction to cross-compiling for Linux,” [Online]. Available: http://www.landley.net/writing/docs/cross-compiling.html. [Accessed 5 August 2019].
[3] Q. documnetation, “Connecting Embedded Linux Devices,” [Online]. Available: https://doc.qt.io/qtcreator/creator-developing-generic-linux.html. [Accessed 5 august 2019].
[4] P. Silisteanu, “Cross compiling OpenCV 4 for Raspberry Pi,” 7 August 2019. [Online]. Available: https://solarianprogrammer.com/2018/12/18/cross-compile-opencv-raspberry-pi-raspbian/. [Accessed 10 September 2019].
[5] wiki.qt, “RaspberryPi2EGLFS,” 25 Septemper 2019. [Online]. Available: https://wiki.qt.io/RaspberryPi2EGLFS.
[6] J. Tranter, “Configuring Qt Creator for the Raspberry Pi,” 3 August 2016. [Online]. Available: https://www.ics.com/blog/configuring-qt-creator-raspberry-pi. [Accessed 1 November 2019].
[7] C. Savtchenko, “Cross Compiling,” 26 April 2013. [Online]. Available: https://www.neyasystems.com/cross-compiling-101/. [Accessed 15 August 2019].
[8] Howtolamp, “Adding Shared libraries to System library path,” [Online]. Available: http://howtolamp.com/articles/adding-shared-libraries-to-system-library-path/. [Accessed 16 August 2019].
If it’s fast and cheap, it will never be good. If it’s cheap and good, it will never work out quickly. And if it is good and fast, it will never come cheap. But remember: of the three you still have to always choose two.
Think about the content that you want to invest in a created object, and only then will form. The thing is your spirit. A spirit unlike forms hard copy.
I love the feel and sophistication of its superiority. I like people with a keen mind and at the same time easy to talk to.
Comments are closed.